
Note: Time Doctor MCP is available only with beta customers for now. It is available on all Time Doctor subscription plans and can be accessed by Owners, Admins, and Managers. Access is read-only and follows the assigned Time Doctor role.
TL;DR:
Add the Time Doctor server to the editor, then sign in with Time Doctor when the browser opens. No keys are required for this method. Each editor uses a slightly different config format; use the block that matches the editor in use.
Which Editors Work
|
Editor |
Sign in with Time Doctor |
|---|---|
|
Yes |
|
|
Yes |
|
|
Yes |
|
|
JetBrains IDEs, such as IntelliJ IDEA, PyCharm, and WebStorm |
Not yet. See the JetBrains section below. |
Before Starting
- A Time Doctor login with the Owner, Admin, or Manager role
- Time Doctor MCP enabled by an Owner or Admin in Settings / AI Connections
- The editor installed and signed in
The Time Doctor server URL is the same for every editor: https://api2.timedoctor.com/api/2.0/mcp/mcp
Each editor opens a browser window the first time it connects. Sign in with Time Doctor and click Allow access.
Cursor
In Cursor, open Customize in the sidebar, go to the MCPs tab, and choose to add a new server. Cursor opens the mcp.json file.
Add Time Doctor using the block that matches the file, then save.
Empty or new file — copy the whole thing:
{ "mcpServers": { "timedoctor": { "url": "https://api2.timedoctor.com/api/2.0/mcp/mcp" } }}
File already has other servers — copy only the Time Doctor entry inside the existing mcpServers section:
"timedoctor": {
 "url": "https://api2.timedoctor.com/api/2.0/mcp/mcp"
}
When Cursor connects, complete the Time Doctor sign-in in the browser. Then ask about Time Doctor data in Cursor's chat, and approve the tool request when prompted.
Config file locations: ~/.cursor/mcp.json for all projects, or .cursor/mcp.json in a project folder for that project only.
Cursor's own guide: Model Context Protocol.
VS Code
Open the Command Palette (Ctrl+Shift+P on Windows, Cmd+Shift+P on Mac) and run MCP: Open User Configuration. To set this up for one project instead, run MCP: Open Workspace Folder Configuration.
Add Time Doctor using the block that matches the file, then save. VS Code uses servers, not mcpServers, and requires a type field.
Empty or new file — copy the whole thing:
{ "servers": { "timedoctor": { "type": "http", "url": "https://api2.timedoctor.com/api/2.0/mcp/mcp" } }}
File already has other servers — copy only the Time Doctor entry inside the existing servers section:
"timedoctor": { "type": "http", "url": "https://api2.timedoctor.com/api/2.0/mcp/mcp"}
VS Code prompts for confirmation to trust the server before starting it. Confirm, then complete the Time Doctor sign-in in the browser.
Open Chat in agent mode and ask about Time Doctor data. Use Configure Tools in the chat box to check that the Time Doctor tools are switched on.
To check the connection later, run MCP: List Servers from the Command Palette.
Microsoft's own guide: Use MCP servers in VS Code.
Windsurf
Open the MCPs icon in the top right of the Cascade panel, or go to Settings, then Cascade, then MCP Servers.
Add Time Doctor to ~/.codeium/windsurf/mcp_config.json, then save. Windsurf uses serverUrl, not url.
{ "mcpServers": { "timedoctor": { "serverUrl": "https://api2.timedoctor.com/api/2.0/mcp/mcp" } }}
Complete the Time Doctor sign-in in the browser when Windsurf connects, then ask about Time Doctor data in Cascade.
On enterprise accounts, an administrator may need to turn MCP on in settings first.
Windsurf's own guide: MCP in Cascade.
Zed
Go to Settings, then AI, then MCP Servers, and click Add Server.
Add Time Doctor to the settings file, then save. Zed uses context_servers, not mcpServers.
"context_servers": { "timedoctor": { "url": "https://api2.timedoctor.com/api/2.0/mcp/mcp" }}
Zed detects that Time Doctor needs authentication and prompts for sign-in. Complete the Time Doctor sign-in in the browser, then ask about Time Doctor data in Zed's assistant panel.
Leave the headers field out. Zed only offers the sign-in prompt when no authorization header is set.
Zed's own guide: Model Context Protocol.
JetBrains IDEs (IntelliJ IDEA, PyCharm, WebStorm)
JetBrains IDEs can connect to MCP servers from Settings, then Tools, then AI Assistant, then Model Context Protocol (MCP). At present, JetBrains AI Assistant has no way to sign in to a server that requires authentication, and no way to send a key instead. It cannot connect to Time Doctor MCP yet.
What to do meanwhile: Use Claude Code, Codex CLI, or Gemini CLI in the IDE's built-in terminal. See Connect Command-Line AI Tools to Time Doctor (Claude Code, Codex CLI, Gemini) - Beta. This provides the same Time Doctor data without leaving the IDE.
Time Doctor is tracking JetBrains' support for authenticated MCP servers and will update this article when it arrives.
JetBrains' own guide: Model Context Protocol (MCP).
Try the First Question
In the editor's chat, paste the following prompt:
"Help me get started with my Time Doctor data. Ask me about my goals and build my first report."
Advanced: Connect With an API Key
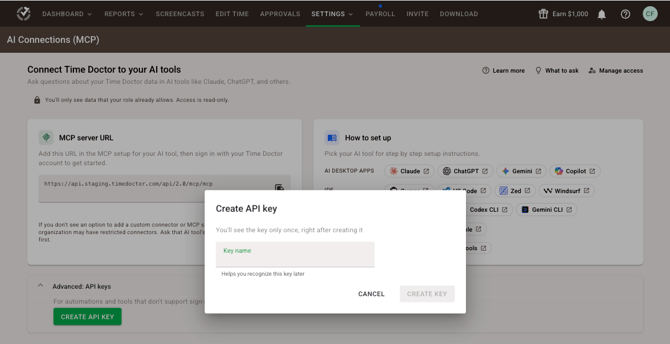
If the editor runs somewhere that cannot open a browser sign-in, use an API key instead. Create one in Time Doctor under Settings / AI Connections, then add a headers block to the Time Doctor entry. Cursor, VS Code, and Windsurf all support this. JetBrains does not.
"timedoctor": { "url": "https://api2.timedoctor.com/api/2.0/mcp/mcp", "headers": { "x-api-key": "YOUR_API_KEY" }}
Keep the URL field name the editor expects: serverUrl in Windsurf, and retain the type line in VS Code.
Treat the key like a password: keep it private, do not share it, and revoke it at any time from Settings / AI Connections. Do not commit a key to source control. For a full walkthrough, see Connect Autonomous AI Agents to Time Doctor (MCP).
Troubleshooting
|
Problem |
Fix |
|---|---|
|
The editor does not pick up the change |
Save the file, then restart the editor. Config files are read at start-up. |
|
The server will not start, or the config is rejected |
Check the field names for the editor. VS Code uses servers with a type line, Cursor uses mcpServers with url, and Windsurf uses mcpServers with serverUrl. Mixing them is the most common cause. |
|
The browser sign-in page does not open |
Check that the browser did not block the pop-up, then reconnect the server from the editor's MCP settings. |
|
Sign-in fails, or a permissions error appears |
Confirm with the Time Doctor Owner or Admin that Time Doctor MCP is enabled in Settings / AI Connections, and that the assigned role is Owner, Admin, or Manager. |
|
VS Code repeatedly prompts to trust the server |
Confirm the trust prompt once for this server. It appears the first time a new server starts. |
|
The editor answers without using Time Doctor data |
Name the tool directly, for example: "Using Time Doctor, show hours tracked this week." In VS Code, confirm Chat is in agent mode. |
|
Windsurf does not show the MCP option |
On enterprise accounts, an administrator needs to turn it on in settings first. |
|
A screen does not match the steps above |
These editors update frequently. Check the editor's own guide, linked at the end of each section, for the current layout. |
Disconnecting
Remove the Time Doctor entry from the editor's config file and restart the editor. Access can also be ended from the Time Doctor side, in Settings / AI Connections, which immediately stops that tool from reading Time Doctor data.
Next Step
See Getting Started — What to Ask Your Time Doctor AI Connection - Beta.
Should there be any inconsistencies or concerns regarding the article, contact support@timedoctor.com for prompt assistance.