
Note: Task and No-Task Modes are available on all Time Doctor pricing plans and can be accessed by Admins and Owners from Settings / Company Settings.
TL;DR:
-
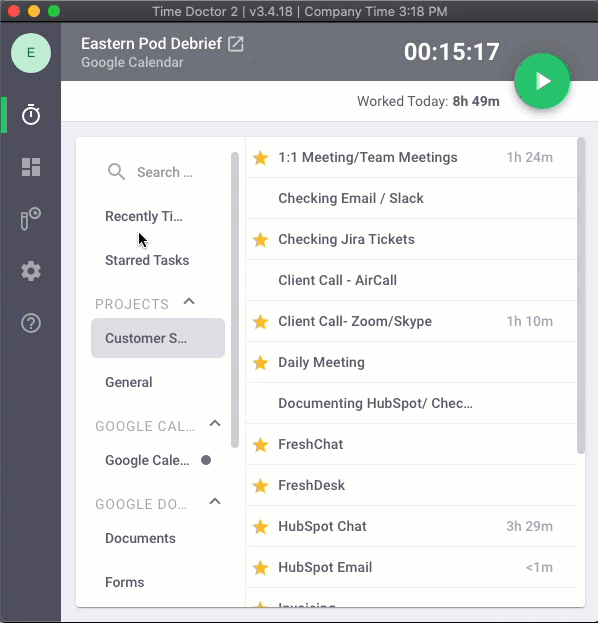
Task Mode: Requires selecting a project and task before tracking. Projects display on the left, tasks on the right.
-
No-Task Mode: Allows starting/stopping tracking without assigning a project or task.
-
Enable or disable via Settings / Company Settings → Use projects & tasks.
-
Both modes are included in all plans; switching modes does not require reinstalling the app.
Time Doctor’s desktop application can operate in two modes: Task Mode and No-Task Mode. Both modes use the same installer, and switching between them is controlled by a single setting in the web app.
Task Mode
-
Projects appear on the left panel.
-
Tasks appear on the right panel.
-
Tracking begins only after selecting a specific project and task.
-
Useful for teams that require detailed activity data linked to specific tasks.
No-Task Mode
-
The desktop app only requires starting and stopping tracking.
-
Projects and tasks are not assigned when tracking.
-
Best suited for companies that prefer simple time tracking without categorization.

How to Switch Between Modes
-
Navigate to Settings / Company Settings.
-
Locate the setting Use projects & tasks.
-
Set the toggle to:
-
On → Enables Task Mode.
-
Off → Enables No-Task Mode.
-
Changes apply instantly without reinstalling the desktop application.

Key Notes
-
Only Admins and Owners can access and change this setting.
-
Managers can be permitted to create projects and tasks if allowed under Company Settings.
-
Task Mode supports integrations via the Chrome or Firefox extension (e.g., Jira, Asana).
Should there be any inconsistencies or concerns regarding the article, contact support@timedoctor.com for prompt assistance.