
Note: Schedules Feature is available with Standard and Premium Time Doctor Subscription Plans.
Permissions and Access
- Admins and Owners – Full access to schedules.
- Managers – View only by default. Enable Allow managers to set up schedules in Settings / Company Settings to allow edits.
- Regular Users – To request leave or create shifts, enable the relevant permissions in Settings / Company Settings.
TL;DR:
Enable Use Schedules in Settings / Company Settings page, add shifts or leave schedules in Settings / Schedules, and manage schedules via CSV import or export. Adjust permissions in Settings / Company Settings to allow managers and users to edit or request schedules.
The Work Schedules feature helps create shifts and leave schedules for users, ensuring accurate attendance tracking and efficient workforce management.
Enabling Work Schedules
- Go to the Settings / Company Settings page.
- In Features, turn on the Use Schedules toggle.
- Click Save.

Adding a Schedule
Creating a Shift
- Go to Settings / Schedules.
- Click + Add Schedule.
- Select the users to schedule.
- Choose Shift as the schedule type.
- Enter the shift start and end times.
- (Optional) Add Minimum Required Hours.
- Click Save.
Creating a Leave Schedule
- Go to Settings / Schedules.
- Click + Add Schedule.
- Select the users.
- Choose Leave as the schedule type.
- Select Paid or Unpaid leave.
- Enter the leave start and end times.
- Click Save.
Tip: For more details on Leave tracking, please see How to Use Leave Tracking in Time Doctor
Method 1: Importing and Exporting Schedules (CSV)
Export Schedules


- On the Settings / Schedules page, click Export CSV.
- Download and open the CSV file.
Import or Update Schedules

- Click Import CSV.
- Download the template or use the exported CSV.
- Update schedules as needed. Do not modify the Unique Identifier column.
- Save and upload the file.
- Select the time zone when prompted.

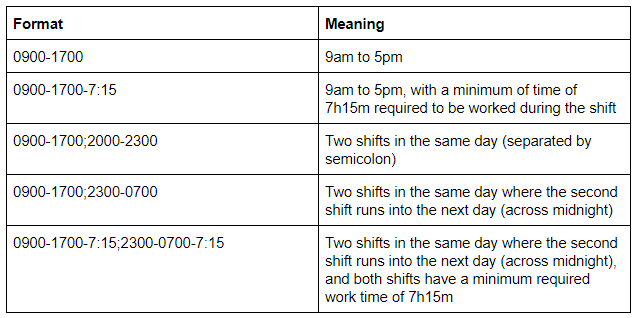
Here’s a sample file with the shifts filled out.
Note: For shifts in multiple time zones, create separate files for each time zone.
Editing or Removing Schedules
Edit or remove schedules by uploading the same CSV file with shifts modified or removed. Any dates and users in the imported file overwrite existing schedules for those users and dates.
How to Set Up Schedules for the Whole Year Using CSV Import
For repeating schedules, such as Monday to Friday, 9 a.m. – 5 p.m.:
- Export a CSV for the full year by selecting dates until year-end in Date Range under Export Schedule.
- Set up shifts for one day or week.
- Copy them across the year in the CSV file.
To exclude weekends, turn off the Include Weekends toggle under Export Schedule. To learn more tips and tricks, click here.
Method 2: Adding and Editing Individual Shifts Without CSV Export
Add, edit, or delete individual shifts directly:
- Hover over a day without a shift to see the plus icon and add one shift.
- Hover over an existing shift to display icons for editing or deleting it.
- Select multiple shifts or all shifts to delete them at once.

Who Can View or Edit Schedules
- Owners and Admins – View, add, and edit schedules for all users.
- Managers – View schedules of managed users. With Allow managers to set up schedules enabled in Settings / Company Settings page, create and edit schedules for managed users.
- Regular Users – View only their schedules by default. With permissions enabled in the Settings / Company Settings page, request leave or create shifts.
- Clients – No access to this page.
Daylight Savings

Daylight savings time changes apply based on the time zone selected in the import popup.
When creating a shift without CSV import, daylight savings changes follow the time zone selected when creating the shift.
Example:
- In 2021, daylight savings starts on March 14 in Toronto and March 28 in Berlin.
- When Berlin is selected as the time zone for shifts from March 1 to March 20 (9 a.m. – 5 p.m.):
- Viewing with Berlin time zone shows all shifts at 9 a.m. – 5 p.m.
- Viewing with Toronto time zone shows March 1–14 shifts as 3 a.m. – 11 a.m. and March 15–20 shifts as 4 a.m. – 12 p.m.
To keep schedules stable in a specific time zone, select that time zone when creating schedules. For multiple time zones, upload separate files for each time zone.
Attendance Report
After adding schedules, view attendance data in Reports / Attendance page. Learn more about the Attendance report here.
Tips
- Verify shift times after importing to ensure correct time zone settings.
- Use leave schedules to accurately track time off for payroll and attendance.
Should there be any inconsistencies or concerns regarding the article, contact support@timedoctor.com for prompt assistance.